How to Get Started with GitHub: Beginner Step-by-Step Guide
A practical beginner guide to creating a repo, committing changes, and pushing to GitHub the right way.
Overview
GitHub is a web-based platform that uses Git for version control. It’s most commonly used for software projects, but it can manage almost any type of file. It provides distributed version control for tracking file changes, plus collaboration features like issues, pull requests, and project documentation.
This tutorial is a quick, minimal path to using GitHub as a repository for your files, projects, and applications. You’ll create a repository on GitHub and learn these core commands:
git clonegit addgit commitgit push
What you’ll do
- Install Git for Windows (includes Git Bash).
- Create a new GitHub repository.
- Clone your repository locally.
- Modify a file and stage + commit your change.
- Push to GitHub and verify the update.
Downloading Git Bash
We’ll use a terminal for commands in this guide. On Windows, Git Bash (installed with Git for Windows) is an easy option. On Linux or macOS, your default terminal works fine.
If you’re on Windows, download Git for Windows: https://gitforwindows.org/
During setup, the default options are usually fine.
💡 Tip: In Git Bash, pasting is often easiest with Shift + Insert instead of Ctrl + V.
Creating a GitHub repository
In your browser:
- Log into GitHub and go to your Repositories page.
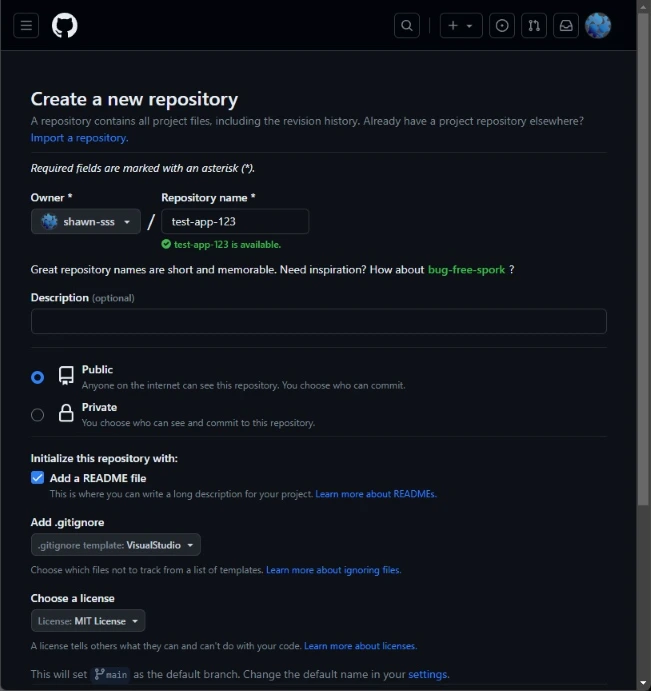
- Click the green New button.
- Fill in the options:
- Repository name – lowercase-with-hyphens is a good convention.
- Description – optional; you can add/edit later.
- README – optional (we’ll edit it locally in this tutorial).
- .gitignore – optional; pick a template matching your stack/IDE (e.g.,
VisualStudio). - License – optional; MIT is common for open source, but choose what fits your needs.
- Click Create repository.
Cloning your repository
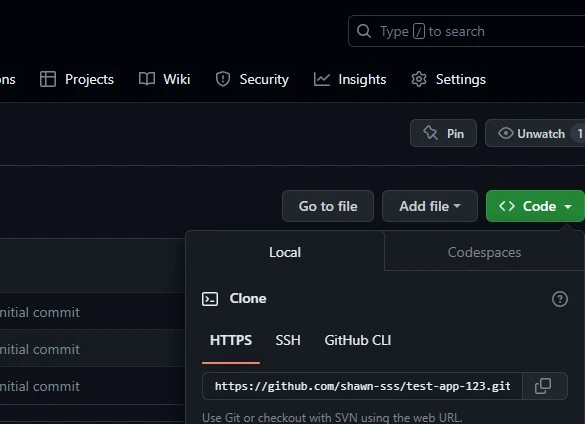
- On your new repo page, click the green Code button.
- Copy the HTTPS URL.
Open Git Bash in the folder where you want the repo:
- Right‑click in the folder → Git Bash Here, or
- Open Git Bash and
cdinto the folder.
Git clone
git clone REPOSITORY_URL_HEREYou may be prompted to sign in to GitHub. After cloning, you’ll have a new project folder containing a hidden .git directory (Git metadata).
Modifying your repository
Let’s make a simple change to README.md.
- Open
README.mdin a text editor (e.g., Notepad). - Add a new line, for example:
Hello world! - Save the file.
Back in Git Bash, make sure you’re inside the repo folder.
If this is your first time using Git on this machine, set your identity once:
git config --global user.name "Your Name"
git config --global user.email "[email protected]"
Use your GitHub profile name for user.name (the name you want shown on commits). This is different from your GitHub username/login handle.
For user.email, you can use your regular GitHub email, or turn on Keep my email addresses private in GitHub settings and use the provided noreply address.
Stage your change (git add)
git add .Commit your change (git commit)
git commit -m "Update README.md"You can be more descriptive, e.g.:
git commit -m "Add hello message in README.md"Pushing your changes
Send your local commits to GitHub.
Git push
git pushIf this is your first push, Git may ask for credentials or permission to use saved credentials.
Verifying your changes
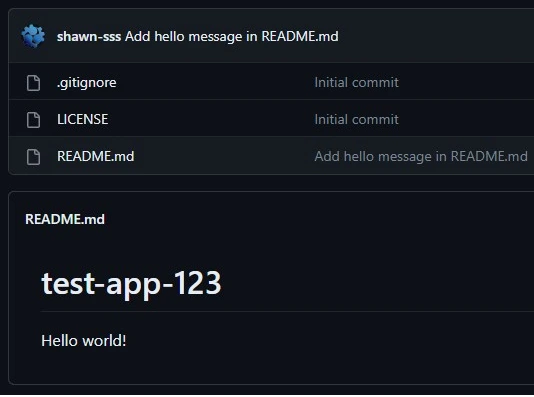
Back in the browser on your repository page, you should see:
- The latest commit message near the top (e.g., “Update README.md”).
- The README.md rendered at the bottom of the file list—your “Hello world!” line should be visible.
Conclusion
You just covered the essentials of Git + GitHub:
- Create a repository on GitHub
- Clone it locally
- Stage and commit changes
- Push to the remote and verify
These fundamentals are the backbone of most projects. When you’re ready to go further, explore branches, pull requests, and merging—they unlock powerful collaboration patterns and safer workflows for experimenting with new features.